back Sidebar
All sidebar tabs of the image annotation tool explained.
Annotations
The annotations tab shows a list of all annotations on the current image, grouped by their label. A click on a label expands the list item to show all annotations that have this label attached. Each annotation is represented by the icon of the shape of the annotation and the user who attached the label to the annotation. A click on an annotation list item selects the annotation. A selected annotation is highlighted both on the image an in the annotations list. A double click on an annotation in the list will make the viewport pan and zoom to show the annotation on the image.

An annotation can have multiple labels by multiple users attached to it. This means that there may be multiple highlighted items in the annotation list for a single selected annotation.
At the very top of the annotations tab there is the annotation filter. Annotations can be filtered by label, user, shape or annotation session. You can use the filter e.g. to display only your own annotations on the images. Whenever the annotation filter is active, the button of the annotations tab will be highlighted so you don't forget the active filter.
Label Trees
The label trees tab shows all label trees that are available for the image. Here you can find and choose the labels you want to attach to new or existing annotations. Use the search field at the top to quickly find labels of deeply nested label trees. Mark up to ten labels as favorites to quickly select them with the 0-9 keys of your keyboard. To select a label as favorite, click the icon next to the label in the label tree. Now it will appear in the "Favorites" label tree at the top and can be selected with a shortcut key. Click the icon of a favorite label again to remove it from the favorites.
If there already are some annotations with the selected label in the same volume, example annotation patches will be displayed at the bottom of this tab. Use these patches as a reference to decide if the label is actually the one you are looking for. You can disable the example annotations in the settings tab.
Annotation Modes
See the Navigating Images section for more information on the available annotation modes.
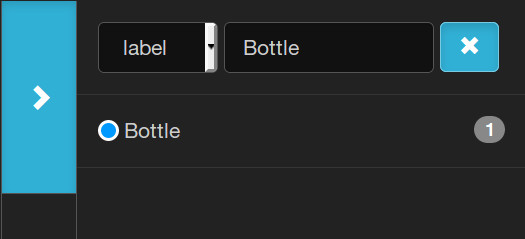
Image Labels
Image labels are labels that are attached to a whole image instead of annotations. Only project editors, experts or admins can modify image labels. To attach a new image label, select a label in the label trees tab (or use a shortcut), then open the image label tab and click the button in the top right corner. To detach an image label, click the button next to it.
Attaching image labels with the image label tab is useful if you need to explore the whole image in order to determine the correct image label. If an image thumbnail is enough (e.g. to sort out bad images where the camera flash didn't fire properly) you can attach and detach image labels more quickly in the volume overview.
Color Adjustment
The color adjustment tab allows you to manipulate some of the visual properties of the image. This can make finding interesting objects or regions on the image easier and quicker, e.g. if the images are very dark or have a low contrast.
Brightness/Contrast
These are arguably the most important properties that can be adjusted on an image. Choose a brightness value larger than 0 to increase the brightness of the image. A value lower than 0 decreases the brightness. Adjusting the contrast works just the same. You can also adjust the brightness individually for each color channel of the image. Click on the button and the slider for the brightness will expand into three sliders for the red, green and blue color channels. Press the button again to get back to adjusting the brightness for all color channels at once.
Gamma
Gamma adjustment allows you to make dark regions brighter or bright regions darker in the image. Use a value between 0 and 1 to make dark regions brighter or a value greater than 1 to make bright regions darker.
Hue
Adjusting the hue will "rotate" the colors of the whole image. Blue pixels my become green or red pixels may become blue, depending on the position of the hue slider. This can be useful not only for people with dyschromatopsia but for others as well since the human visual system can differentiate between more shades of green than any other color.
Saturation/Vibrance
Increasing the saturation will make the colors more "loud". Decreasing it will eventually result in a black and white image. In contrast to that increasing the vibrance will only affect colors that are not highly saturated already. Decreasing it will only affect the highly saturated colors.
Settings
The settings tab allows you to customize the image annotation tool and provides some advanced features.
Click the capture screenshot button to get a screenshot of the currently visible area as a downloadable image. Note that the screenshot does not include the whole image but only the visible area of your current viewport.
The annotation opacity slider allows you to make annotations more transparent or hide them completely. Note that this setting will be remembered permanently so don't be confused if no annotations show up the next time you open an image in the image annotation tool.
The cached images slider allows to preload the selected amount of images. The default amount is one. This allows you to move between images more quickly.
The LabelBOT timeout slider allows you to control the time after a LabelBOT popup automatically closes. Move the slider to the left to enable automatic closing.
The progress indicator switch constrols the display of the indicator element next to the image filename in the navbar. The indicator shows your progress through the current (filtered) volume and whether you have seen all images.
The minimap switch enables you to show or hide the minimap. A hidden minimap can be particularly useful in Lawnmower Mode where you need to see all of the displayed viewport.
The mouse position switch controls the display of an additional map overlay that shows the current position of the cursor on the image in pixels.
The zoom level switch controls the display of a map overlay that shows the current zoom level of the viewport.
The scale line switch controls the display of a map overlay that shows the a scale line. By default, the scale is shown in pixels. If image area information is available (via image metadata or laser point detection), the scale is shown in meters.
The label tooltip switch controls the display of a tooltip that appears when you hover your cursor over annotations. The tooltip shows the names of the labels that are attached to these annotations.
The measure tooltip switch controls the display of a tooltip that appears when you hover your cursor over annotations. The tooltip shows the length of line string or the area of rectangle, circle or polygon annotations. If image area information is available (via image metadata or laser point detection), the length/area is shown in meters.
Export Area
The export area can be used to restrict generated reports to a specific area of the images of a volume. Click edit to draw or edit the export area. The area can be drawn similar to a rectangle annotation and will be permanently displayed on all images of the volume. If a report is set to be restricted to the export area, only image annotations inside this area will be considered. Delete the export area with the delete button. Set the export area opacity to 0 to hide it.
The example annotations switch allows you to enable or disable the example annotation patches that are displayed in the label trees tab.
If you performed a laser point detection in the current volume you can adjust the opacity of the laser point markers in this tab as well. Set the opacity to 0 to hide them altogether.